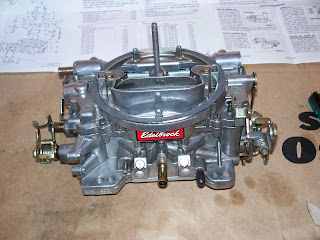
I'm not sure where I got it in my head that a carburetor is hard to rebuild. Sure, there are some fiddly bits, but that can be said of most anything with more than five moving parts. As you can see in the previous post, I have an Edelbrock Performer 600cfm manual choke carburetor.
So I removed all the hoses from the engine to the carb, then pulled it off There was a spacer plate and two gaskets underneath, not sure why they're there, any ideas?
Ran over to Autozone and picked up an Edelbrock rebuild kit (#1477) and some Chem-Dip to clean up the parts. Total $66.35.
Started taking apart the top part of the carb. This video from Edelbrock really helped in getting the top half off, and removing the metering springs. I predict the next video in the series will also be handy for tuning the carb when I get it back on a working engine.
 |
| After the top was off. |
It's a good thing I did take them off too, because under each of those cylinders were a mesh fuel filter. And one of the fuel filters had clogged up with nasty black stuff. I'm super glad I didn't cut any corners and skip doing that just because I didn't have the right tool at the time.
Getting into the guts, only to find some nasty junk in the gas reservoirs (where the floats sit).
Taking out the venturi assemblies (there are 2 large ones and two small ones):
Then I took out the jets (there are 4 of them). Word of warning: mark which jets are which. I took the primary and secondary jets out and mixed them up. This is bad because they look identical, but have slightly different openings. After close scrutiny I was able to discern the primary jets from the secondary jets, however if you have a different jet setup in your #1405 carb, or you have different carb with closer sized jets, it may not be possible to discern the difference.
Dipped all the removable parts in the chem-dip then took some carb cleaner and a toothbrush to the main body and bowl (the large left and right pieces, respectively).
It was time to reassemble the carb. The first major hurdle was getting the floats adjusted correctly (floats are those brass looking things in the upper right that float in the gas reservoirs on either side of the main body of the carb, seen on the lower left).
Floats have two adjustment heights (as measured from the "roof" of the carb to the top of the float). The first is the high level mark. When the reservoirs are full the floats are at their minimum distance from the roof of the carb. The floats themselves are attached to needles that seal off the gas flow to the reservoir when the the reservoirs are full. My floats were still calibrated right for the high level, 5/16th of an inch from the float to the roof. They were quite a bit off for the low level.
It's kind of hard to see, but after adjusting the closest float, you can see the rear float is still far too low. They are easy to fix though, just take some pliers and gently bend the brass tab near the float fulcrum.
From there it was just placing some gaskets and screws back on, and getting the linkages hooked back up and I was done.
Ohhh, shiny.
I ended up not replacing the two mesh fuel filters and instead using the single large fuel filter that was provided in the kit that slips into the inside of the fuel inlet fitting (upper left thingy in the above picture). That way if the filter clogs, I can just remove the fuel line and undo the fitting and have easy access to the mesh filter; otherwise I'd have to take the whole top part off the carb again (and risk tearing the gasket) to change the two fuel filters that came stock on this model.
One point of worry is that I'm not sure if this carb is going to be big enough for a 383 stroker engine, which is what I hope to turn my current 350 engine into. And if you notice the PCV port (protruding pipe from the bottom middle of the carb) has two ports on either side of it. The one on the left is uncapped and is called the Ported Vacuum port, the one on the right that has a rubber cap is called the Full Time Vacuum port. I had the Ported Vacuum (left one) hooked up to some do-dad next to the distributor cap. The Edelbrock videos said the Full Time Vacuum should have been hooked to something in the transmission (for automatic transmissions, which I currently have). Not sure why it's supposed to go to the tranny, any ideas?
Anyway, I'm thinking of putting a 5-speed manual transmission in there so I may not have to worry about it.
So, again, yay for me. Although I can't be sure it's done right until it's on a working engine, I'm still proud of the fact that I made some real progress. Now, to find a cherry picker and engine stand for the next big push: removing the engine (I'll need help).


The Vacuum line that goes to the transmission goies to the vacuum control module on the back of the tranny, that controlls shift points. That carb might be a little small for a 383, but should work fine. Just depends on how much power you are trying to get out of it.
ReplyDeleteWowee, DJ! Looks good and I'm impressed by the huge brain you have. Oh yes!
ReplyDeleteJust so you know, if it ends up being 5 speed, I will be very happy and will want to take it out for a drive. If it is an automatic.. well, it will be an automatic.