1/30/11

Serendipity, Pt.1

It's Friday night.  After a semi-productive band practice up North, I get a call from P.S. who has arrived at my house, in my absence.  Luckily I left a key so he could get in while J.W. and I make our way back to to my place for a weekend of car and alcohol related activity.

By the time we all sorted out our greetings it was about 12 am, so we decided to get to work in the garage.

First order of business, clean the garage floor.  Now I had sprayed it down and spot-washed areas where oil and/or automatic transmission fluid had pooled on the concrete floor the day before.  Note: hand soap works ok, detergent not so much.

In the interim 24 hours when I had washed the floor and put the car back in the garage it had leaked MORE fluid.  So we needed to clean up a little before the garage mat I bought could go down.  I read that baking soda can lift some stains.
The proper use of baking soda.
It doesn't work so well.

Anyway, then we rolled out the garage mat.
It's got grooves that channel fluids toward the garage door side.
It did come in handy.  Fully recommended.

The next order of business was to drain the transmission fluid.  First we removed some of the metal lines that leave the tranny for the radiator.  No fluid was forthcoming.  After failing to locate a drain plug on the transmission pan (there isn't one, which is pretty dumb), we just unbolted all but three bolts on one side and pried on one side till we were able to drain the fluid.
J.W. draining the fluid.
We then left the pan off for the fluid to drain overnight.  To be continued...

1/25/11

Sometimes When Things Happen...

You just wish you had a camera.  And sometimes you do.

This last weekend, I was able to remove: the starter/solenoid, the gas pump, both of the headers (even the stuck one), almost every tube/wire to the engine save for two.

  1. Some tube to the power steering reservoir... I unfastened the clamp, but the tube won't budge, I may end up just cutting it off.
  2. A ground wire(?) that is affixed to a bolt that holds the bell housing of the transmission to the engine proper.
I removed some long, thin, metal tubes that apparently took transmission fluid from the gearbox and sent it to the radiator for cooling (I assume).  And then I removed this piece of tubing
It was attached to a brass L shaped fitting at the top of the intake manifold, here
It's the brass bit that looks like it's pointing toward the distributor (brown thingy) on top of the intake manifold (aluminum thingy).
I removed the end that was affixed to the manifold, but the other end wasn't attached to anything... at least it wasn't any more.  Big mystery.  Who knows what it is?  And where does it go?

After that work was done, I took a break.
And that pretty much ended my work for the weekend.  However, I was able to jet down to Eugene today to pick up...
A nice heater and an engine stand from a pleasant older gentleman who used it to rebuild his Chevy 350 into a 383, just as I plan to do.

His advice: "Get a crate motor."  Haha- here's to ignoring the advice of old men and sage friends!

1/24/11

I Promise...

I did get some important things done this weekend.  Despite:

  • Having an emergency convening of the board of directors (and some of my favorite people) for my other project.
  • Going dancing on Friday in Eugene with some of my other favorite people.
  • Then dancing in Corvallis with some of my other-other favorite people (I like a lot of people, what can I say?  I'm a people person).
I'll write more about what I got done this weekend tomorrow, as there will be new developments after tomorrow night.

Cheers.

1/18/11

Long Weekend, Some Progress

I did end up buying some tools.  A shopvac, and an air-compressor.  The air-compressor I wanted was made in China, so I ended up getting a smaller model from Home Depot (assembled in the USA).  Hopefully it lasts.

Filled up the tires with air, so I can roll it out easier for when the garage mat comes in the post.  Then did a little bit of heavy lifting.

First, I drained the radiator.  There's a drain spigot on the bottom driver's side of the radiator.
And note, there is more than 2 gallons of fluid in there, so prepare accordingly.  Then I removed the radiator, cowl, the fan, the alternator and the spark plug wires and distributor cap.
After the radiator was out, I drained the oil.

Next I tried to remove the exhaust.  Tried being the operative word there.  Everything from the collectors back was pretty easy (the mufflers and such).  But on the passenger side, I couldn't really access the last bolt that holds the header on because of the damned AC unit.  The drivers side wasn't much better, although I got all the bolts off I couldn't get the headers out by dropping them through the bottom of the engine bay, or by lifting them through the top.  I can't seem to jack my car high enough to allow for enough clearance to get them out.
Wedged in there.
So, if I can figure out how to undo that last bolt, then remove the fuel line and the metal radiator lines, I think the engine will be attached to the car through the tranny and the engine bolts, nearly ready to be lifted out.

Next week, try to get the headers out of there, and maybe drain the transmission fluid.  Oh and dispose/recycle the fluids from this week.

For fun here's a picture of the removed parts of exhaust sitting in the corner of my garage.
Note the nice new shop vac.

1/15/11

Toolarme...

Which in Spanish means, "To give me a tool".

I'm looking for an engine stand. Seen 'em on Craig's List for as low as $40. Thinking I'll rent an engine hoist when I need it. Also want an air compressor to pump up my tires.

Buying this now.  Need to keep the floor clean, as it's not really mine to dirty up.

1/11/11

Decisions, decisions: Exhaust

I've been thinking about exhaust notes as of late.  I kind of hate the Flowmaster 40's because they remind me of two things a) trucks and b) douchebags.

That being said, my buddy suggested the Chambered Exhaust, which was apparently an option for first-generation Z-28 Camaros.

They sound pretty awesome.


Going for about $500 here.

Any other cool exhaust ideas?

1/10/11

"Hooray for our side."

My first victory in the better part of a decade, and the taste is sweet.

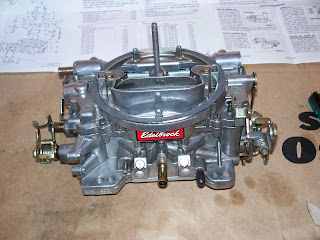
I'm not sure where I got it in my head that a carburetor is hard to rebuild.  Sure, there are some fiddly bits, but that can be said of most anything with more than five moving parts.  As you can see in the previous post, I have an Edelbrock Performer 600cfm manual choke carburetor.

So I removed all the hoses from the engine to the carb, then pulled it off  There was a spacer plate and two gaskets underneath, not sure why they're there, any ideas?
Ran over to Autozone and picked up an Edelbrock rebuild kit (#1477) and some Chem-Dip to clean up the parts.  Total $66.35.

Started taking apart the top part of the carb.  This video from Edelbrock really helped in getting the top half off, and removing the metering springs.  I predict the next video in the series will also be handy for tuning the carb when I get it back on a working engine.
After the top was off.
By the way, I eventually did remove the needle and seat assembly (the brass looking cylinders at the top left and top right of the big piece in the above picture) but I didn't have a big enough flathead screwdriver at first to remove them.  Turns out you need a 5/16th inch flathead to really get them off.  Although, if you don't care about saving them (the rebuild kit comes with spares) you can probably take the vice grips to them to get them off.

It's a good thing I did take them off too, because under each of those cylinders were a mesh fuel filter.  And one of the fuel filters had clogged up with nasty black stuff.  I'm super glad I didn't cut any corners and skip doing that just because I didn't have the right tool at the time.

Getting into the guts, only to find some nasty junk in the gas reservoirs (where the floats sit).
Taking out the venturi assemblies (there are 2 large ones and two small ones):
Then I took out the jets (there are 4 of them).  Word of warning: mark which jets are which.  I took the primary and secondary jets out and mixed them up.  This is bad because they look identical, but have slightly different openings.  After close scrutiny I was able to discern the primary jets from the secondary jets, however if you have a different jet setup in your #1405 carb, or you have different carb with closer sized jets, it may not be possible to discern the difference.

Dipped all the removable parts in the chem-dip then took some carb cleaner and a toothbrush to the main body and bowl (the large left and right pieces, respectively).
It was time to reassemble the carb.  The first major hurdle was getting the floats adjusted correctly (floats are those brass looking things in the upper right that float in the gas reservoirs on either side of the main body of the carb, seen on the lower left).

Floats have two adjustment heights (as measured from the "roof" of the carb to the top of the float).  The first is the high level mark.  When the reservoirs are full the floats are at their minimum distance from the roof of the carb.  The floats themselves are attached to needles that seal off the gas flow to the reservoir when the the reservoirs are full.  My floats were still calibrated right for the high level, 5/16th of an inch from the float to the roof.  They were quite a bit off for the low level.
It's kind of hard to see, but after adjusting the closest float, you can see the rear float is still far too low.  They are easy to fix though, just take some pliers and gently bend the brass tab near the float fulcrum.

From there it was just placing some gaskets and screws back on, and getting the linkages hooked back up and I was done.
Ohhh, shiny.

I ended up not replacing the two mesh fuel filters and instead using the single large fuel filter that was provided in the kit that slips into the inside of the fuel inlet fitting (upper left thingy in the above picture). That way if the filter clogs, I can just remove the fuel line and undo the fitting and have easy access to the mesh filter; otherwise I'd have to take the whole top part off the carb again (and risk tearing the gasket) to change the two fuel filters that came stock on this model.

One point of worry is that I'm not sure if this carb is going to be big enough for a 383 stroker engine, which is what I hope to turn my current 350 engine into.  And if you notice the PCV port (protruding pipe from the bottom middle of the carb) has two ports on either side of it.  The one on the left is uncapped and is called the Ported Vacuum port, the one on the right that has a rubber cap is called the Full Time Vacuum port.  I had the Ported Vacuum (left one) hooked up to some do-dad next to the distributor cap.  The Edelbrock videos said the Full Time Vacuum should have been hooked to something in the transmission (for automatic transmissions, which I currently have).  Not sure why it's supposed to go to the tranny, any ideas?

Anyway, I'm thinking of putting a 5-speed manual transmission in there so I may not have to worry about it.

So, again, yay for me.  Although I can't be sure it's done right until it's on a working engine, I'm still proud of the fact that I made some real progress.  Now, to find a cherry picker and engine stand for the next big push: removing the engine (I'll need help).

1/6/11

Mid Week Organizing: Shelving

So, I just bought and put together this bad boy.  You can assemble it as shown, or divide the top and bottom half to form two work benches, one with three shelves and one with only two.  I opted for the latter configuration.  One bench will be my fireworks station.  The other will be devoted to Camaro work.  Garage now seems a bit more narrow, but definitely more useable.  No sitting on the ground while fiddling with engine parts!

1/2/11

1000 Words

For reference, here's what the engine bay looked like before I started too much monkeying around in there.
That useless AC unit is going to get ripped out.


Yes, I know the "Heartbeat of America" valve covers are tacky, don't expect them to stay.  If you know any potential buyers though...

1/1/11

Even the Longest Journey...

Begins with cleaning the garage.

I moved into my new place in July.  My good friend and I offloaded a bunch of shit into the garage (two-car) and I've basically just let it sit there ever since.

Here's what it looked like:

Three walls stitched together, you can see the Camaro along the bottom
Not horrible by any means, but certainly neglected.

To steel myself for the impending cleanup I had some dinner

Mixed myself a drink
2 parts gin (Plymouth)
3 parts pineapple juice
Drizzle of raspberry liqueur (Chambord)
Shake with ice.
Then put on some appropriate music
And shortly after, I have this

Now on to the carburetor.

What am I doing?

I have made a resolution: I will fix my car

These five simple words are now going to occupy my weekends for the next six months. I'm no mechanic (hence the title of the blog) and I've really only a theoretical knowledge of how cars work. I hope that between my cursory knowledge, the internet and some helping hands along the way I will succeed in my goal.

The Car
Make - Chevrolet
Model - Camaro RS
Year - 1967
Engine - 1969 Chevy 350 (originally from an Impala)
  • Carb - Edelbrock 1405 Performer 600cfm
  • Intake - Edelbrock Performer dual-plane
  • Heads - Unknown
  • Lifters - Unknown
  • Rockers - Unknown
  • Camshaft - Edelbrock Performer (unknown model)
  • Ignition - Unknown High Energy Ignition (HEI)
Transmission - 400 Turboglide 3-speed automatic
Torque Converter - unknown
Exhaust - Headers and mufflers (brand unknown)
Brakes - Stock drum
Rear End - Stock 10 bolt
Suspension - Stock with rear air shocks (brand unknown)

Clearly there's a lot about this car that I don't know. Although I should, because it and I have...

A Little History
In 1993 my older brother acquired the Camaro for $5200 dollars. It was in decent shape and ran consistently, if sub-optimally.

I inherited the car in 1996 when my brother went off to the Army.

Since then I've crashed it twice, paid various mechanics of various skill and honesty an untold sum of money to install or repair various bits and pieces. Alas it has been sitting on jack stands for the past seven years. Now that I've got my own place and a decent garage I am going to attempt to restore the car to excellent working and aesthetic condition.

State of the Union
It doesn't run. It leaks transmission fluid. The interior smells of gas, feels oily, and looks middling to poor. The exterior looks good at first glance, but the rain gutters are bubbling with rust, the seams don't look uniform (on the side where I was hit by a car), and there is light scratching throughout the paint, especially on the trunk. The headlight covers have never worked. The wiring is a mess. Left muffler rattles against the floorboards. Interior lights don't work. The glove box won't open. Braking is always a gamble (and pulls to the left). Air conditioning is just dead weight, radio doesn't work at all and the heater only works on the foot setting.

The Plan
Stage 1 - Engine and drivetrain
Stage 2 - Suspension and Brakes
Stage 3 - Exterior and interior

In stage 1 I hope to get the engine rebuilt to a 383 stroker, install a positrac rear end, new mufflers and headers, and have the transmission rebuilt. I hope to do this work mostly by myself (except the machine shop work, and the tranny). July 4th 2011 I will be finished with stage 1.

Stage 2 and stage 3 are tentatively scheduled for July 4th of the subsequent years (2012, 2013).

My first steps: clean the garage, rebuild the carb.